

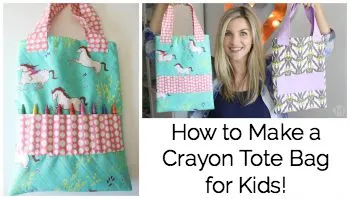
Hello there! I hope you are well! I have a super fun new sewing tutorial for you, How to Sew A Crayon Tote bag! This is a very simple project, beginner friendly and I show you how to do all the steps. This past weekend I had 2 little girls birthday parties to go to. I have been wanting to make this bag for awhile, so this gave me a good reason do to so! I have other crayon wallets, but my goal was to make Mom’s life easier with this project. Some of the crayon wallets require you to cut up pieces of paper in order for the crayon wallet to be useful – I wanted to make sure this tote bag could fit an entire coloring book or sticker book. This way, it makes car rides, restaurants or other outings a little easier and Mom doesn’t have to remember to cute up some more paper! Plus, kids love to be able to be in charge of what toys they bring.
Materials
2 – Outside fabric pieces cut 11 x 14
2 – Lining fabric pieces cut 11 x 14
2 – Interfacing, I used fusible fleece, Pellon 987 cut 11 x 14
1 – 9.5 x 7 inch piece for pocket
4 – 2.5 x 18 strips for straps
Coordinating thread
Sewing machine
Water soluble pen
Optional: Walking foot
Crayons and such to fill it up
Click HERE for the downloadable PDF version
Written Instructions:
-Attach fusible fleece to both outer pieces using manufacturer instructions (be sure to attach glue side to wrong side of fabric)
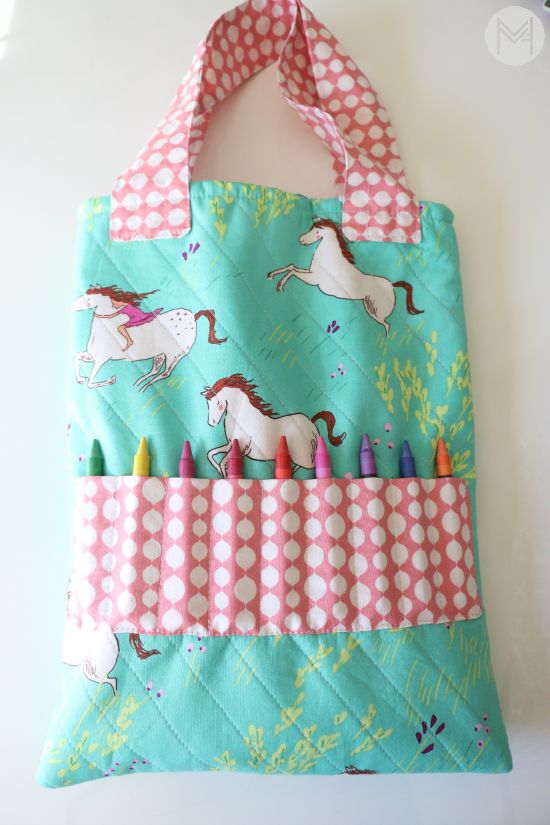
– Fold pocket in half lengthwise right sides touching and using 1/4 inch seam, sew along the raw edge leaving a few inch gap to flip right side out.
*This is the time to quilt your outer pieces if you choose to do so
– Once the pocket is sewn, clip the corners, flip right side out and press with iron
-Pin pocket in place 4 inches from the bottom of the bag and 1 inch from the sides.
-Using a small ruler measure 1/8 in from the edge and then put dots with a water soluble marker 1 inch apart to mark the spots for the stitched lines for crayons
-Sew the pocket down the side, along the bottom and other side making sure to backstitch at beginning and end.
-Using your dots, stitch lines for crayon pockets backstitching at each end
– Use a wet rag and remove dots from pocket
-Sew outer pieces together. Place right sides together and sew down side, bottom and side using 1/2 inch seam allowance.
-Clip corners and turn right side out and press with iron
Straps
-Take 2 strap strips and place right sides together. Sew around using a 1/4 inch seam allowance and leave few inch opening for turning right side out
-Clip corners, turn right side out and press
– Using a 1/8 inch seam allowance topstitch around entire strap to close gap
Optional: Stitch 2 additional lines down the strap. Sew 5/8 inches from each edge. Backstitch at beginning and end.
*Do the same thing with the other strap
Lining
-Place right sides together and sew 1/4 seam down the side, bottom and side. *LEAVE A FEW INCH GAP ON THE BOTTOM SEAM
-Clips the corners
Attaching Straps
-Pin strap in place 1 inch from the sides of the bag and 1.5 inches from the top. Pin 3 remaining straps.
-Sew along the top stitch seam line of the strap back stitching at the beginning and the end. Do for all 4 strap ends.
-Place bag inside the lining. Put the straps down inside the bag. *Be sure the right sides of the fabric are touching for the lining and outer peices
-Pin the side seams first and then pin the remaining bag in place and sew a 1/2 inch seam allowance. Be sure nothing is getting caught underneath the bag.
-Using the opening at the bottom of the lining turn the bag right side out
– Pop corners out of lining and stitch the opening closed
– Place the lining inside the bag and press the top seam to prepare for top stitching
-Top stitch around the top of the bag using a 1/4 inch seam allowance and include the straps in the stitching for added security.
Here are a few coloring books from amazon that I was drooling over myself!
*These are amazon affiliate links. Using my links earns me a small commission and helps me purchase supplies for more videos! THANK YOU for the support!
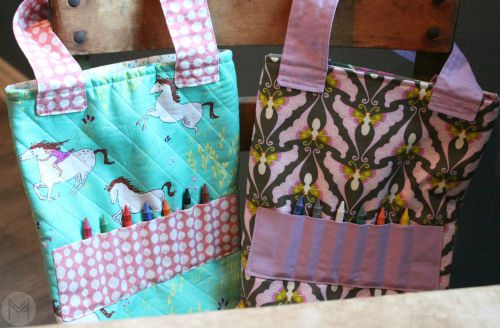
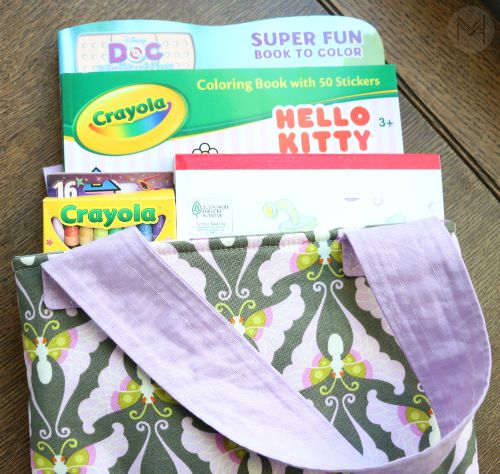
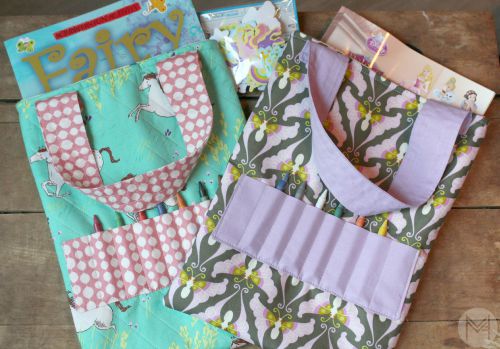
Here are a few of the things I put in this tote bag the gift. Now, my daughter is begging for her own! She has already picked out her fabric! My son wants one too!
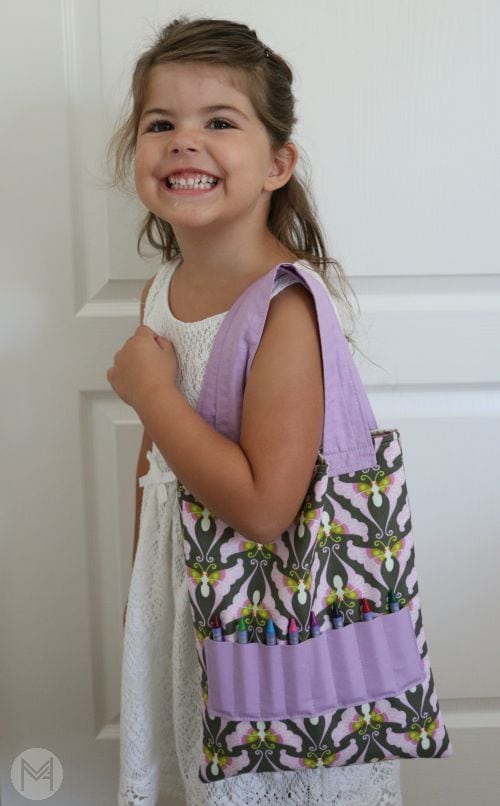
Here is my 4 year old cutie showing off how well it fits on a little kids arm!
I hope you enjoyed this project! If you liked it, please share this post with a friend! It helps get the word out about this channel 😉
Here is the full video tutorial!
Susan
Saturday 20th of August 2016
I love this totebag, going to make it forsure for my Grandkids Beautiful.. Thank you
Theresa
Tuesday 7th of June 2016
Hi there. I stumbled upon this project on Pinterest and immediately fell in love with it. Your directions are very clear and easy to follow. I love the fact that you have a video tutorial for it as well. I have mad 3 since discovering it. My question is at what point could I add a magnetic clasp so the bag can close? Any insight you have would be greatly appreciated. Thank you for sharing the pattern. It's amazing.
Sandra
Saturday 28th of May 2016
Hi Melanie. I was so happy to find your project on Pinterest. I so heart this project so I included it on my round-up post about sewing projects you can make for your kids.
You can see the post here, https://sewuber.com/make/things-to-sew-for-kids/
Please let me know if I missed something about your blog and do let me know if you want to change or add anything.
Xoxo, Sandra
P.s. I’m a new fan ;)
Jill
Thursday 7th of April 2016
Hi Melanie, I made this tote last night. Your directions are very clear & easy to follow so my tote actually turned out well! I think our granddaughter is going to love it. Thanks so much for sharing your talent w/us via Youtube and your blog. I love your videos!
Diana Meredith
Tuesday 15th of March 2016
Love this! Is it okay to sell a bag made from this tutorial? I have a friend who asked for one and I do have an etsy shop, so I could see others asking me to sell them. I would, of course, credit you and link to your blog in the listing. If not, I totally understand! Wanted to check first. :)
Melanie
Tuesday 15th of March 2016
Yes, I am ok with people selling individual items with my patterns ;)