This big pig has a zippered pocket containing six (or more, if you like) little piglets that look just like her! The piglets have Velcro snouts allowing them to 'nurse' at the matching Velcro dots on Mama Pig's belly. Let her loose in your play pigsty and let your little farmer have at it. Mama is even big and sturdy enough for small children to ride her for a fun change of pace. At the end of a long day of farming, prop your feet on her for a bit of rest.
WHAT YOU NEED:
Download the cutting pattern and the sewing pattern for steps three and four.
1 yard of 58/60" pink fleece
1 spool of coordinating thread
Scraps of pink, black, white, and brown felt for eyes, ears, feet, nostrils
1/4 yard (or fat eighth) of quilting-weight cotton or muslin for pocket
10" pink zipper
Black embroidery floss
12" of pink yarn, cut into six 2" lengths, for piglet tails
6" length of Velcro, 5/8"- or 3/4"-wide, cut into 6 circles; or 6 Velcro dots (preferably pink)
3" of 1/4"-wide elastic for tail
Two 12-ounce bags of fiberfill
Finished dimensions — Mama Pig is 12" tall x 20" long x 14" wide; Baby Pigs are 3" tall x 4 1/2" long x 3 1/2" wide
Seam allowance — 1/2" unless otherwise specified
1. Measure, mark, and cut
Fold the fabric in half lengthwise with the right sides together, aligning the selvages. Position and pin the paper pattern pieces according to the cutting diagram. Cut them out and transfer the markings from the pattern pieces to the wrong side of fabric. Then cut the additional pieces as listed.
Pig side snout and pig tail (cut 2)
Pig upper body (cut 2)
Pig side body (cut 2)
Pig lower body (cut 2)
Pig ear (cut 2)
Pig snout front (cut 1)
Piglet body 5 per piglet (cut 30)
Piglet snout 1 per piglet (cut 6)
Cut from white felt:
Pig ear (cut 2)
Piglet ear 2 per piglet (cut 12)
Cut from darker pink felt:
Piglet ear 2 per piglet (cut 12)
Piglet foot 4 per piglet, (cut 24)
Pig nostrils (cut 2, trace from pig snout front)
Cut from brown felt:
Piglet foot 4 per piglet (cut 24)
Cut from black felt:
Pig eye (cut 2, trace eye placement circle on upper body pattern)
Cut from cotton:
Inside pocket 9" x 20" rectangle (cut 1)
Note: Position the grainline arrow on the pattern pieces along the straight grain of the fabric. The smaller pieces, such as the ear and snout, can be fit in between the larger pieces.
2. Make piglet ears and feet
Pin the white piglet ears to the pink piglet ears. Edgestitch around all the sides.
Pin the brown piglet feet to the pink piglet feet. Edgestitch around all the sides.
3. Make piglet upper body
For each piglet body, do the following:
Pin two piglet body pieces with the right sides together, and stitch along one curved edge.
Using black floss, embroider two French knots for eyes on the front of the piglet body at the placement marks, one on each body piece.
With the white side facing up, baste the straight edge of one piglet ear behind each eye at the placement marks. Fold the upper body at the fold marks with the right sides together, catching the straight edge of the ears in the fold. Stitch or hand-sew 1/8" from the fold to secure the bottom edge of the ear in the shallow fold of fabric.
If you want the piglets to match their mama, tack the tips of the ears to the upper body.
4. Make piglet lower body
For each piglet body, do the following:
Baste the straight edge of four piglet feet to one piglet body at the placement marks (shaped end pointing toward back of piglet), with the pink side facing up. Fold the upper body at the fold marks with the right sides together, catching the straight edge of the feet in the fold. Stitch or hand-sew 1/8" from the fold (as for the ears). This becomes the piglet bottom.
Pin the piglet bottom to a plain piglet body piece with the right sides together, and stitch along one curved edge. Stitch another piglet body piece to the other side of the piglet bottom, leaving a 2 1/2" opening for turning and stuffing.
5. Complete the piglets
For each piglet body, do the following:
For the tail, knot one 2" length of yarn at both ends. Pin the upper body to the lower body, right sides together, and insert the yarn between layers at the piglet rear, letting one knotted end hang out. Stitch all around, catching the yarn in the stitching.
Turn the piglet right side out through the opening and stuff. Hand-sew the opening closed with a slipstitch or whipstitch.
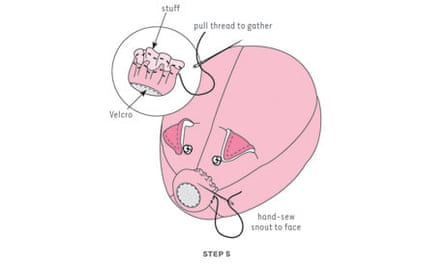
Stitch the loop half of a Velcro circle in the center of the piglet snout.
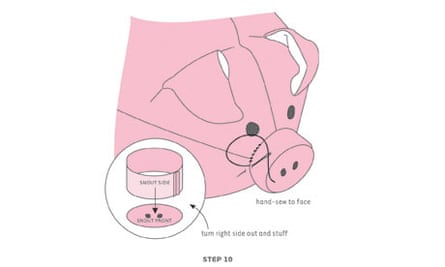
Hand-sew a running stitch close to the edge of the snout and pull the thread to gather and shape the snout. Stuff the snout lightly and then sew the gathered edges closed.
Hand-sew the snout onto the piglet's face using a slipstitch or whipstitch.
6. Stitch the pig top body
Pin two upper body pieces together and stitch along the top edge. Stitch the pig eyes to the upper body at the placement marks.
Pin the white pig ears to the pink pig ears with the right sides together.
Stitch along the curved side edges, leaving the bottom edge open. Clip the seam allowance and turn the ears right side out. Attach the ears to the pig top body at fold placement marks, as you did for the piglet ears. Hand-tack the tip of each ear to the body at the placement marks.
7. Make the pig tail
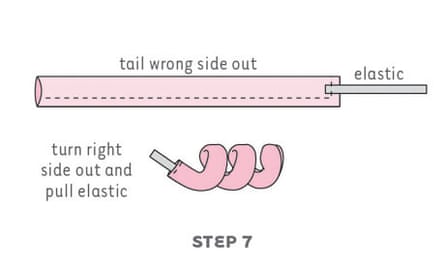
Fold the tail in half lengthwise with the right sides together. Pin a 3" length of elastic to one short edge so the elastic extends away from the tail. Stitch the long edge and the short edge with the elastic, catching the edge of the elastic in the seam. Leave the opposite short end open for turning.
Turn the tail right side out (the elastic is now inside the tail) and pull the elastic tight to make the tail coil. Stitch the opening closed, catching the free end of the elastic in the stitching.
8. Create the inner pocket
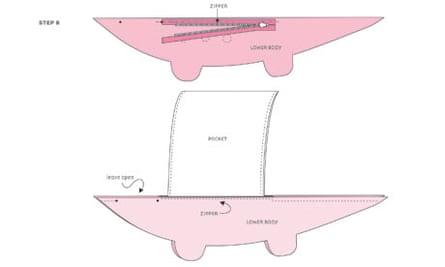
Open the zipper. With the right sides together, pin the zipper tape along the straight raw edge of one lower body at the zipper placement markings.
Baste the zipper in place, using a zipper presser foot.
With the right sides together, align one short edge of the pocket with the same lower body at the zipper placement markings, sandwiching the zipper between the fleece and pocket layers. The zipper pull should extend beyond the zipper placement markings.
Stitch the layers together, using a zipper foot.
Pin and stitch the opposite side of the zipper to opposite short edge of the pocket and remaining lower body in similar fashion.
Fold the pocket in half widthwise with the right sides together, aligning the two lower body pieces at the same time. Stitch the side edges of the pocket.
Stitch the lower body pieces together from the front tip to the zipper and from the zipper to the back tip, leaving an opening as marked on the pattern for stuffing and turning.
9. Complete the pig body
Stitch the hook half of the Velcro dots to the lower body, three on each side of the zipper at the placement marks.
Pin a side body to one side of the lower body, aligning the feet and bottom raw edges. Stitch along the bottom edge. Repeat, stitching the remaining side body to the other side of the lower body.
Pin the lower/side body and upper body with the right sides together, aligning the raw edges. Sandwich the tail between the layers at the rear and stitch the side seams.
Turn the pig right side out through the opening. Stuff the pig, filling the feet firmly before stuffing the body. Insert all the piglets into the pocket about halfway through stuffing to ensure that you leave enough room for them inside the pig.
Finish stuffing the pig firmly. Hand-sew the opening closed.

Comments (…)
Sign in or create your Guardian account to join the discussion