

You would think, out of this entire series, that December would be the easiest of all. There is so much imagery and décor out there for this season, how difficult could it be to pick something? Turns out, pretty difficult. I’ve been agonizing about this one for months, and while I had ideas I was excited about for all the others, December was practically blank. I finally sat down at my desk with an outline of the shape I’ve been basing these on and a pencil. I started looking around my decorated home, and the pieces fell together into this sweet snowman. It was a Christmas miracle. Okay, maybe that’s overstating it a little, but I’m still pretty happy with how this guy turned out.
If you’re new to this series, it started in February, and you can see the previous months here. January is supposed to be the final month, but I’m considering extending it to about a year and a half so I can finish out the rest of my ideas. I’ll let you know for sure when next month’s pattern is out.
To make this frosty fella, you’ll need:
this pattern (be sure to print at 100% size)
Insul-Bright
cotton batting
cotton fabric
fusible interfacing
black and orange felt
black and orange embroidery thread
a bell, pom pom or tassle

Snowman pieces
Cut out the pieces as indicated on the pattern and shown above.
Iron the interfacing onto the scarf ends and face piece. Set the face aside. Pin the scarf ends with one interfaced piece and one non-interfaced piece with right sides together. Stitch (all seams on this project are 1/4”), leaving the short end open. Clip the corners, turn right side out and press. Repeat with the remaining scarf ends. Set aside

Snowman scarf ends
Pin the two hat pieces right sides together and stitch, leaving the straight edge open. Clip the corner, turn and press. Set this aside as well.

Snowman hat
Stitch the seams between the four pieces to assemble the snowman’s head. Press the seams away from the white face section.

Assembled snowman head
Pin the eyes and nose in place and draw the mouth on lightly with a pencil, using the pattern as a guide.

Preparing snowman face
Stitch the eyes and mouth with black embroidery thread and the nose with orange. I used a straight stitch for the eyes and nose, and a backstitch for the mouth.
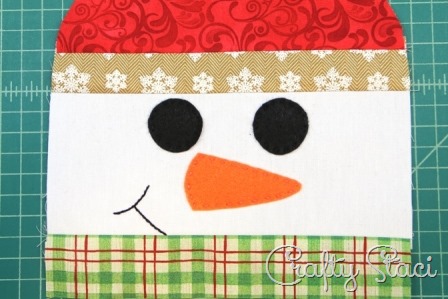
Snowman face
I feel like I stack these layers different on each of these. Sorry about that, I should probably be more consistent. Since that’s not likely to happen, I’ll just tell you how this one went. Lay down the cotton batting first, followed by the Insul-Bright. Add the snowman face on top of that. Lay the hat face down on top with the straight edge even with the top of the head. Add the scarf ends with the two short ends even with the right edge of the scarf. You’ll need to pin the hat and scarf ends back so they don’t get sewn into the seam. I recommend safety pins. That straight pin on the scarf was a bear when it came to turning this.

Preparing hat and scarf for assembly
Lay the back of the head on top, right side down. Stitch around the edge, leaving 3” open at the bottom. Clip the corners, turn and press. Topstitch around the edge, flipping the hat up so it’s not caught in the stitching.

Snowman topstitching
Stitch a bell, pom pom or tassel to the tip of the hat and you’re done!
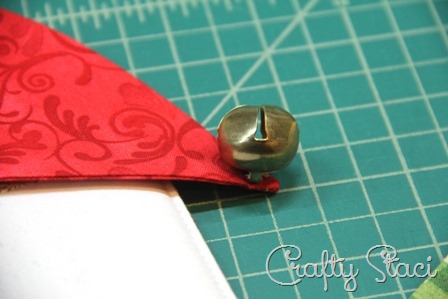
Attaching bell to hat
I think I actually love this one more because he was so challenging to come up with.

Snowman Hotpad from Crafty Staci
Tell me this guy wouldn’t make that cup of cocoa just a little sweeter.
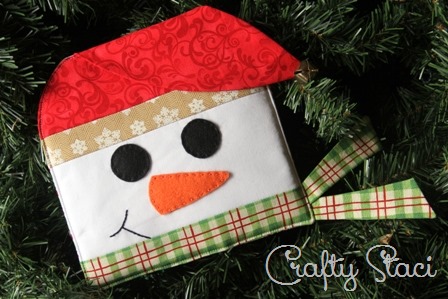
December Snowman Hot Pad of the Month